
Introduction: Vagrant Box
Did you ever experience the pain after your DEV PC crashed? Or the tedious steps to help a new hire to set up his DEV environment? If so, you may be interested in reading the post.
The post will give step-by-step instruction on how to build a virtual DEV enviroment and use Vagrant to make it reusable and shareable. The final artifact is called a BOX in Vagrant world (https://www.vagrantup.com/).
Despite there are many public boxes available, we sometimes need to build it from scratch for organization’s security compliance. Packer (https://www.packer.io/intro/) is a tool that helps your automate the build steps, but inevitably you need to build a box manually at exploring phase. And this post will focus on the manual process.
What to Include in the Box
The box we are going to build will include the following:
- Ubuntu 14.04: with dos2unix, curl, ssh server installed, and with OpenOffice removed
- Oracle JDK 1.8.0_144, with JCE
- GIT 2.11.0
- Eclipse: Oxygen, with code formatter, Gradelw and Maven pre-configured
- Maven standalone
- Nodejs, with npm 4.3.1, grunt and bower
- docker 1.32
- docker-compose 1.17.0
How to Build Virtual Machine
The following assuming your host is Windows.
- Download and Install VirtualBox 5.1.26 from https://www.virtualbox.org/wiki/Download_Old_Builds_5_1
- Download its Guest addition http://download.virtualbox.org/virtualbox/5.1.26/
- Download and install Vagrant https://www.vagrantup.com/downloads.html
- Download Ubuntu 14.04 desktop and install it to VirtualBox
- user name/password: vagrant/vagrant
- Shutdown Ubuntu
- Customize your virtual machine’s CPU, memory, dual display from VirtualBox settings
- Restart Ubuntu, the guest addition should be installed automatically. If not, unmount and remount the cd to the downloaded guest addition ISO file. The disk autorun should kick off automatically and it will install the guest addotion.
- Remove Open Office:
- sudo apt-get remove –purge libreoffice*
- sudo apt-get clean
- sudo apt-get autoremove
- Remove Amazon application (Note don’t do sudo apt-get remove unity-webapps-common)
-
/usr/share/applications/ubuntu-amazon-default.desktop
/usr/share/unity-webapps/userscripts/unity-webapps-amazon/Amazon.user.js
/usr/share/unity-webapps/userscripts/unity-webapps-amazon/manifest.json
-
- Add vagrant user to su
- $ sudo visudo
# Add the following line to the end of the file.
vagrant ALL=(ALL) NOPASSWD:ALL
- $ sudo visudo
- Install vagrant public key
- $ mkdir -p /home/vagrant/.ssh
- $ wget –no-check-certificate https://raw.github.com/mitchellh/vagrant/master/keys/vagrant.pub –O /home/vagrant/.ssh/authorized_keys
- $ chmod 0700 /home/vagrant/.ssh
- $ chmod 0600 /home/vagrant/.ssh/authorized_keys
- $ chown –R vagrant /home/vagrant/.ssh
- Install ssh server
- $ sudo apt-get install -y openssh-server
- check file /etc/ssh/sshd_config to ensure:
- Port 22
- PubKeyAuthentication yes
- AuthorizedKeysFile .ssh/authorized_keys
- $sudo service ssh restart
- sudo apt-get dos2unix
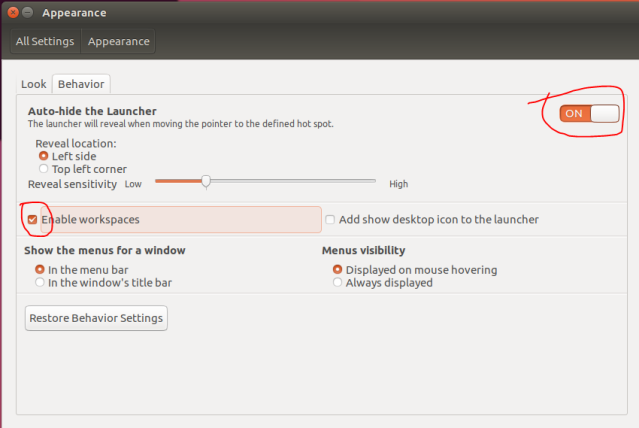
- Hide Ubuntu taskbar and enable workspace
- Optionally, you can pause here and build your first base box and test it. I omit this step to keep the post short. In fact, you can build a new box after each of the following steps to make reusable intermediate boxes.
- Install Java
- sudo add-apt-repository ppa:webupd8team/java
- sudo apt-get update
- sudo apt-get install oracle-java8-installer
- Ensure the file /etc/profile.d/jdk.sh presents , and contains a line
JAVA_HOME=”/usr/lib/jvm/java-8-oracle“ - Download JCE from java website to /vagrant, and copy the two jars into /usr/lib/jvm/java-8-oracle/jre/lib/security
- rm the downloaded files
- Install GIT
- sudo apt-get install git
- Install Maven
- cd /opt
- sudo wget http://httpd-mirror.sergal.org/apache/maven/maven-3/3.5.2/binaries/apache-maven-3.5.2-bin.tar.gz
- sudo tar -xvzf apache-maven-3.5.2-bin.tar.gz
- sudo mv apache-maven-3.5.2 maven
- sudo nano /etc/profile.d/maven.sh
export M2_HOME=/opt/maven
export PATH=${M2_HOME}/bin:${PATH} - sudo chmod +x /etc/profile.d/mavene.sh
- sudo rm apache-maven-3.5.2-bin.tar.gz
- log out then log in
- Edit the /opt/maven/conf/settings.xml to have your maven local and remote repos. For example
<localRepository>/home/vagrant/myRepo/.m2</localRepository>
- Install Eclipse
- Download Eclipse Linux version from https://www.eclipse.org/downloads/
- cd ~/Download
- tar -zxvf eclipse-inst-linux64.tar.gz
- sudo chown -R vagrant:vagrant eclipseinstaller
- cd eclipse-installer
- ./eclipse-inst
- select IDE for Java EE Developers
Use default /home/vagrant/eclipse/jee-oxygen
use default workspace dir /home/vagrant/eclipse-workspace
right click the icon and lock to lanucher
import formatter from file google-java-styleguide.xml
- sudo nano /etc/profile.d/eclipse.sh
export PATH=/home/vagrant/eclipse/jee-oxygen/eclipse:${PATH}
- sudo chmod +x /etc/profile.d/eclipse.sh
- Open the preference -> maven -> user settings to ensure the file is pointing to /opt/maven/conf/settings.xml
- Install Docker
- sudo apt-get update
- sudo apt-get install apt-transport-https ca-certificates curl software-properties-common
- curl -fsSL https://download.docker.com/linux/ubuntu/gpg | sudo apt-key add –
- sudo apt-key fingerprint 0EBFCD88 Verify that you now have the key with the fingerprint 9DC8 5822 9FC7 DD38 854A E2D8 8D81 803C 0EBF CD88
- sudo add-apt-repository “deb [arch=amd64] https://download.docker.com/linux/ubuntu $(lsb_release -cs) stable”
- sudo apt-get install docker-ce
- Install docker-compse
- sudo curl -L https://github.com/docker/compose/releases/download/1.17.0/docker-compose-`uname -s`-`uname -m` -o /usr/local/bin/docker-compose
- sudo chmod +x /usr/local/bin/docker-compose
- Install Node.js
- curl https://raw.githubusercontent.com/creationix/nvm/master/install.sh | sh
- source ~/.profile
- nvm install 4.3.1
- npm install -g grunt
- npm install -g bower
Build and Test Your Vagrant Box
- In your Ubuntu:
- $ sudo dd if=/dev/zero of=/EMPTY bs=1M
- $ sudo rm -f /EMPTY
- $ sudo cat /dev/null > ~/.bash_history && history -c $$ exit
- Then shutdown your VM. Do the following from the host Windows:
- vagrant package –output mydev.box
- vagrant box add ecs-java mydev.box
- Test it from your Windows
- Create a folder
- Create a file named Vagrantfile and save it with the following content
- Vagrant.configure(“2”) do |config|
config.vm.box = “mydev”
config.vm.provider “virtualbox” do |vb|
vb.gui = true
end
end
- Vagrant.configure(“2”) do |config|
- Run “vagrant up”
- Wait until command finish
- Now you can either “vagrant ssh” into it, or you can log into your VM from Ubuntu UI.
Congratulations. You have your DEV environment ready for you!
Share Your Box
Now you can share your box with your colleagues. You can either upload your box to a Vagrant repository, or put it into your shared directory (for example \\myShareDir). Then you insert a line to your vagrant file after the line “config.vm.box” and give it to your colleague.
config.vm.box_url = “file:////mySharedHost/mySharedDir/mydev.box”
After he installed Vagrant and VirtualBox, he can just simply run “vagrant up”.
